Nothing sours the excitement of arriving at a remote wilderness campsite quite like spending forty-five minutes tearing apart your vehicle just to find a single headlamp.
When you head out on a multi-day overland journey, hunting trip, or backcountry expedition, your rig is your mobile home, kitchen, and rescue station. Yet, many travelers treat packing as an exercise in spatial geometry: if the trunk closes, the job is done.
The trouble with that approach surfaces on day two. Shifting boxes slide across fragile supplies, wet rain gear ends up buried under dry sleeping bags, and every quick trailside lunch turns into a frustrating excavation project.
Organizing gear for extended travel is not about carrying less; it is about establishing a predictable system. When every piece of gear has a designated home, setting up and breaking down camp becomes a ten-minute routine rather than a chore.
1. Build a Modular, Zone-Based Storage System
A zone-based storage system categorizes equipment by function and packs related items into standardized, labeled containers so you never have to search multiple locations for one task.
Treating your vehicle cargo area as one giant open closet inevitably causes chaos. Instead, divide your supplies into distinct operational categories: sleep, kitchen, recovery, hygiene, and tools.
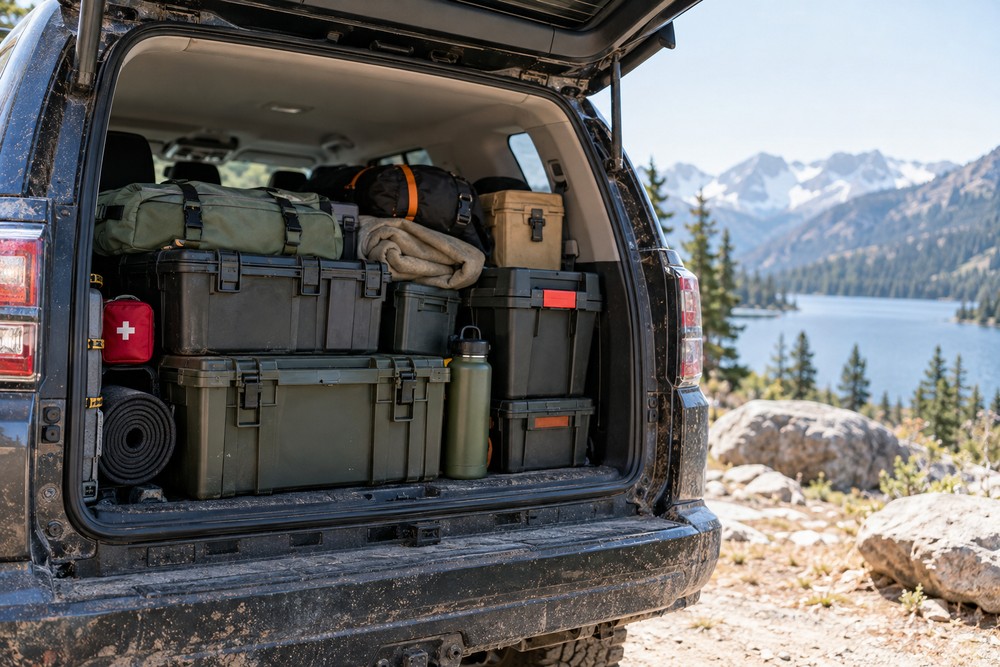
The foundation of this method relies on heavy-duty modular storage bins. Unlike flimsy consumer totes that crack under pressure, rugged, stackable cargo boxes keep equipment secure against washboard gravel roads and sudden braking.
- Use color-coded tags or high-contrast labels on the outside of each container.
- Match container dimensions so bins interlock neatly without shifting during steep climbs.
- Keep everyday essentials in shallow containers rather than deep tubs where small accessories sink to the bottom.
When you pull into camp after dark, you will know exactly which container holds your shelter and which holds your dinner without guessing.
2. Balance Weight Distribution and Vehicle Dynamics
Proper weight distribution requires packing the heaviest gear low to the vehicle floor and centered between the front and rear axles to preserve handling, braking, and fuel economy.
Overloading the rear bumper or stacking heavy iron skillets and tool rolls on an exterior roof rack drastically alters your vehicle’s handling characteristics. Placing excessive weight high up raises your center of gravity, increasing body roll in corners and amplifying rollover risks on off-camber trails.
To maintain proper vehicle weight distribution, organize your payload deliberately:
- Position heavy items—such as high-capacity water jugs, battery stations, winch accessories, and canned goods—directly over or slightly forward of the rear axle, flat on the floorboard.
- Reserve roof racks exclusively for bulky, lightweight items like recovery boards, sleeping pads, or empty fuel canteens.
- Anchor every heavy case with ratchet straps rated for your payload. An unsecured forty-pound tool box becomes a lethal airborne projectile during an emergency stop.
Balancing your vehicle prevents premature suspension sagging, reduces tire wear, and keeps steering responsive on rough terrain.
3. Dedicated Hauling for Bulky Recreational Equipment
Separating mechanical trail machines and oversized sporting gear from your primary living space protects your sleeping quarters from grease, mud, and cabin clutter.
Multi-day excursions often include more than just hiking boots. If your plans involve dirt bikes, an ATV, kayaks, or mountain bikes, attempting to cram that equipment into an SUV or the bed of an overlanding pickup consumes virtually all your usable dry storage. Furthermore, sleeping next to a machine leaking fuel vapors or dripping muddy trail water inside an enclosed cabin is unpleasant and unsafe.
Many outdoor enthusiasts solve this cargo challenge by utilizing a heavy-duty toy hauler camper that carries motorized toys or mountain bikes on an exterior utility deck while unfolding into a clean, off-the-ground living tent at camp. Isolating dirty recreation machinery from clean clothing, dry food supplies, and bedding ensures your living space stays comfortable and orderly no matter how muddy the trail gets.
4. Streamline Camp Kitchen Organization for Rapid Meals
Organizing camp cooking gear into a self-contained “chuck box” keeps all cookware, pantry staples, and sanitation items together for quick meal prep on the go.
Cooking three meals a day outside can consume hours if your ingredients and utensils are scattered across several coolers and loose grocery bags. A proper setup operates like a self-sufficient mobile pantry.
Invest time in thoughtful camp kitchen organization:
- House your stove, fuel canisters, cutting boards, spatula, chef’s knife, and spices inside one dedicated kitchen box.
- Use nested cookware sets that stack compact pots, pans, and bowls inside one another to save valuable cubic inches.
- Separate pre-packaged dry staples (pasta, oats, coffee, spices) from perishable goods, using hard-sided plastic containers to keep mice and ants away.
- Designate two collapsible washbasins—one for wash, one for rinse—along with biodegradable soap and quick-drying microfiber towels right on top of the kitchen bin.
When meal prep is streamlined, stopping along a mountain pass to make hot lunch takes ten minutes instead of turning into an hour-long hassle.
5. Follow the “First-In, Last-Out” Accessibility Rule
The First-In, Last-Out (FILO) rule places emergency items, arrival essentials, and bad-weather gear closest to your vehicle doors so they can be reached instantly without unloading other cargo.
Think about the timeline of your travel day. Items you only need right before crawling into bed—like pajamas or spare blankets—should be packed deep in your trunk space or at the bottom of gear stacks.
Conversely, items you might need roadside should be accessible within five seconds of opening the tailgate:
- Medical First-Aid Kit: Secured in an exterior side pocket or mounted to an interior window molle panel.
- Tire Deflators and Air Compressor: Staged near vehicle access points for quick trail adjustments.
- Rain Gear and Outer Shells: Stowed in an overhead net or the top compartment of your primary duffel.
- Camp Chairs and Table: Packed last so you can set up a comfortable spot to rest immediately upon arrival.
Staging your access points prevents having to unpack four boxes on the muddy shoulder of a highway in the middle of a torrential downpour.
6. Common Packing Mistakes to Avoid
Even experienced travelers fall into organizational habits that cost them time and peace of mind on extended overland trips.
- Using Clear Plastic Storage Totes: While clear bins make it easy to see contents, sunlight heats them up rapidly, spoiling food and degrading plastics. They also advertise your expensive gear to passersby whenever your vehicle is parked at trailheads.
- Failing to Create a “Trash Management” System: Packing gear in is easy, but packing waste out requires thought. Avoid hanging thin grocery bags that tear on branches; use a heavy-duty, external spare-tire trash bag to keep odors and pests out of your interior.
- Overpacking Redundant Clothing: Beginners often pack outfits for every single day. Experienced adventurers pack versatile, odor-resistant merino wool or synthetic layers that can be rinsed and air-dried overnight, cutting clothing bulk in half.
7. The Pre-Departure Staging Checklist
Use this systematic workflow forty-eight hours before heading into the backcountry:
- Staging Area: Lay out all equipment on a clean garage floor or driveway, grouped strictly by zone.
- Dry Run Inventory: Check off food, fuel levels, water filters, batteries, and navigation devices against your master list.
- Consolidation: Remove commercial packaging from food items to cut trash volume by 30% before packing.
- Tie-Down Audit: Once cargo is loaded, shake the containers firmly. If a container shifts under hand pressure, tighten your strap system.
- Accessibility Check: Confirm that your fire extinguisher, first aid kit, and recovery strap can be reached without unbuckling your primary cargo tie-downs.
A successful multi-day adventure is built on predictability and simplicity. When your storage is intuitive and your gear is securely balanced, you spend less time managing equipment and more time enjoying the wild spaces you set out to explore.
By investing in rugged modular containers, respecting your vehicle’s payload balance, and keeping critical tools within arm’s reach, you eliminate the daily friction of camp life. A clean, well-staged rig lets you adapt to shifting weather, tackle challenging trails, and focus entirely on the freedom of the road ahead.